The Hotel Wizard is
where all Hotels are created and managed within the system. The Hotel Wizard
has many different fields and functions for storing data related to the setup
of a Hotel, such as Room types, Room facilities, Room configurations, Hotel contacts,
Hotel Facilities and address.
When you click on the Hotel Wizard, the first screen displayed is
the search Hotel screen. From this screen you can either search for an existing
hotel that has been loaded in the database, or you can add a new Hotel.
Click on Add Hotel to add new Hotel to the data base.


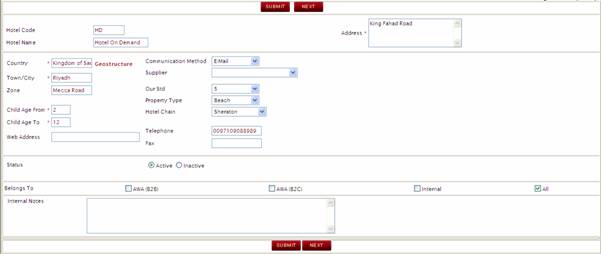
Clicking Add New Hotel
takes the user to a screen for loading the basic details of the hotel as shown
below:
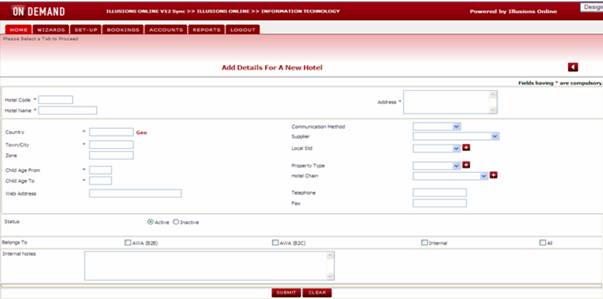
Each field with a * is mandatory.
n
Hotel Code à it is unique to each
hotel, alpha numeric and has to be up to a maximum of 4 letters. (Required)
n
Hotel Name à Name of the Hotel. The Name entered
into this field will appear as the Hotel Name in the booking engine and will
also appear on all client / supplier documentation. (required)
n
Address à the address of the
hotel. This field will appear on the Hotel Address field on the client /
supplier documentation (required)
n
Country/Town/City/Zone à This is set by using the GEO function area. The Zone assigned to (required)
n
Child Age From / To à The general child age
policy stated by the hotel in the contract for e.g.: 0-10 or 0-11 or 0-12 or
0-15. The child policy entered here will determine the child policy that is
used against the contract & supplements. The child policy loaded here will
also be used to validate the rates at contract level. Example if the hotel
child age policy is defined as 0 – 15 and the user makes a booking for 2 Adults
and 1 Child of 16, the system will charge the 16 year old as an adult (even
though the user may have entered the passenger as a ‘child’ passenger type)
n
Web Address à The web link of the
hotel. This is for informational purposes only and does not display anywhere in
the booking engine. (Not Required)
n
Communication Method à The preferred means of
communication between the hotel and the company (email, fax, print). If Email
is selected, the Illusions system will default the flag at Booking
Documentation level to be ‘email’. (Required)
n
Supplier à Supplier of the hotel rates for example it may be the hotel's head
office or a ground operator. If the Hotel is part of a group of hotels (such as
Accor or Starwood), these groups may insist that bookings are made and paid
through a central reservations area rather than made or paid directly with the
hotel. If a supplier is entered into this field, the supplier payments as well
as the documentation will be sent to the supplier and not the hotel (please
note this field is used in conjunction with the “Send Documentation To” field.
If the Send Documentation field is set to “Supplier”, then a supplier must be
defined in the supplier field, otherwise no documentation will be sent. (Required
as needed).
n
Local Standard à The standard of the
hotel as per the hotel e.g. 1, 2,3,4,5...Stars. This field is defined in the
Masters and is at the discretion of the company as to how their Hotels are
defined per category. The Local standard is for informational purposes only and
is not visible during the booking process. (Required).
n
Property Type à The type of the
property for e.g.
n
Hotel Chain à Some hotels belong to a
group of chain e.g. Starwood etc. This field is for informational purposes
only. (required as needed)
n
Telephone / Fax à The Hotels telephone
and Fax number.
n
Status à To activate or inactivate the hotel to the reservation department.
(Required). If the Hotel is set as active, the user will be able to search and
book this hotel via the booking engine. If the Hotel is set to be inactive, the
user will not be able to search and book this hotel via the booking engine.
n
Belongs To à Specify if this hotel
should be for internal use only or B2B or B2C or All areas of distribution. If
‘Internal’ use is selected, the hotel will be available for sale through the
Back Office only. If ‘AWA B2B’ is selected, the hotel will be available through
the AWBE (Online booking engine only), if ‘AWA B2C’ is selected, the hotel will
be available through the B2C (Consumer website only). If ‘All’ is selected, the
hotel will be available for sale through all distribution channels. (Required)
n
Internal Notes à This is a general
notes area for use by the product load team. This information does not display
in the booking engine and is for informational purposes only. (Not required)
Once all the information has been entered, the user clicks on the Submit button to continue to the
next screen.
From this screen below we can now fill in the full information of
the hotel, by clicking on each link.
Details of each link are contained below.

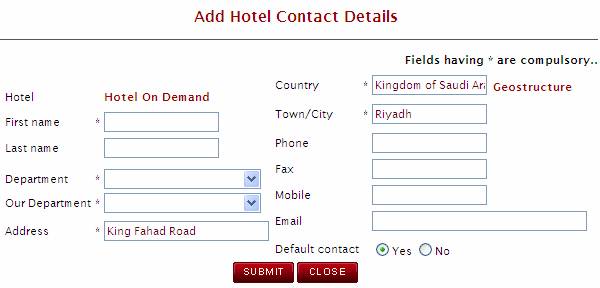
This is where the user will fill in all the contacts information
that the hotel has.
Note: Each Hotel must have at least one default contact.
Click on Contact Details à Add Contact
n
Hotel Name à The name of the Hotel will appear automatically based on the name of
the hotel that you entered on the Hotel header
n
First Name à The name of the contact person
n
Last Name à The surname or last name of the contact
person.
n
Department à The department of the contact person.
The department field will be used to determine what documents are sent to a
particular contact. (E.g. Supplier documentation will be sent to the
reservations contact and the Invoice documentation will be sent to the Accounts
contact.
n
Our Department à This is the internal company department
that may deal with this particular hotel. This is for informational purposes
only.
n
Address à The actual location of the hotel or
address type location. This address will be printed on the client vouchers and
supplier documentation so it is important that a street address be added.
n
Country àClick on the Geo
structure and click to define the country, region, city and zone that
the hotel belongs to
n
Town / City à will be updated from the
Geo.
n
Phone à The number of the contact person who will be in touch with.
n
Fax àThe fax number of the contact person for
communication. If you are using Fax Software such as Relay Fax, you will need
to check the Relay Fax setup guide to determine whether the international
dialing codes should be entered her.
n
n
Email à the default email id of the person to whom the booking will be
forwarded.
n
Default Contact à At least one contact must be defined as the default contact. All
Correspondence will be sent to this default contact. A default can be defined
per department (i.e. one default for reservations and one default for accounts)
etc
Click on Submit button and the hotel contact is updated.
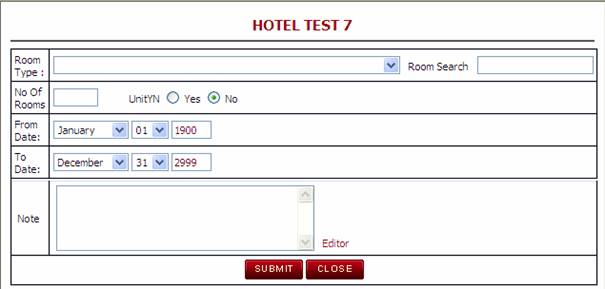
This is where the user defines the specific room types that are
available at this hotel, along with the number of rooms the hotel has in each
room type category.
Click on Room Details à Attach Room Type
n
Room Search à Select a room type
from the drop down list. The room types available in the drop down are sourced
from the Room Types defined in the General Master for ‘Room Type’.
(If the room that you are looking for is not in
the drop down list, then you can create a new room type by going to the General
Masters)
n
No of Rooms à the number rooms of
the room type that the hotel has. (not required)
n
Unit à This field is used in
2 areas in the system. The system will determine whether to show the pricing in
the tariff as SGL/DBL or UNIT depending on what is defined in the Unit field.
It is also used to determine the occupancy tax for cities such as
n
From / to date à The date band that this
room type is valid for. Tip: As it is not often that the room types change for
a hotel, it is advised to create a date range for a period of 20 years or more
so that this area of the system does not need to be regularly maintained.
n
Notes à The notes defined
against the room type will be displayed to the user during the booking process
(for both the AWBE and Back Office) (Required if you wish to display room
information to the users during the booking process)
The facilities of the hotel can be selected from those added in
General Masters and can be viewed via the Product Information “View” link
during the booking process. Although facilities are not mandatory, they are
useful for providing the user with Hotel details which can assist them with
selecting a hotel which matches the client’s requirements.
Click on Hotel Facility Details à Attach Facility
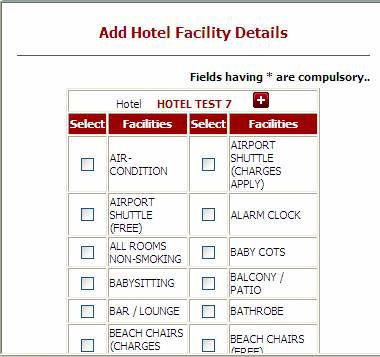
Choose the Hotel Facilities that are applicable for this hotel and
Submit
This area is used for adding one or
more descriptions of the hotel. The descriptions added here can be viewed by
the users during the booking process (via the Back Office and the AWBE).
It is possible using this feature, to
create different descriptions for the Back Office and the AWBE. This means you
can customize the descriptions based on your target audience.
The Hotel descriptions can also be
added in different languages. Please note that there is no translation feature
in Illusions and all text must be translated prior to entering into Illusions.
The Hotel Description Language will
determine what language the Hotel description is to be shown to the client.
Example: If the Client has the default language of German, and there is a hotel
description that has been created in German, then the German version of the
Hotel description will appear to this client.
Click on Hotel Description à Add Description
Tips: You can Delete Descriptions by selecting the one and clicking
on Delete Description or Modify a Description by clicking on it.
See example below of multiple descriptions loaded against one
hotel.

Click Add description and the following page will appear. Click on
the editor button and create your Hotel Description.

n
Hotel àThe Name of the Hotel
will be displayed automatically.
n
Language àThe language area
allows you to choose the language of the description you are entering. The
language defined in the General Masters.
If you wish to display your description n 2 languages then you can enter
the description in English as well as an alternate language. The language
entered will be displayed to the user in the language that has been defined
against the client. Example if you enter a description in English and Spanish,
and the client language is set to Spanish, then
the descriptions displayed to the user via the AWBE will appear in Spanish. If
the client language is defined as Spanish, but no Spanish descriptions exist,
the system will display the English Description by default.
n
Belongs To àThis determines where
to display the description (either the Back Office, Web or both)
n
Description (Editor) à Click on the Editor link to open the HTML editor which allows you
to enter a description (or cut and paste from another document or source). You
can also use the editor to change the font, color, text size in order to
customize the look and feel of your descriptions.
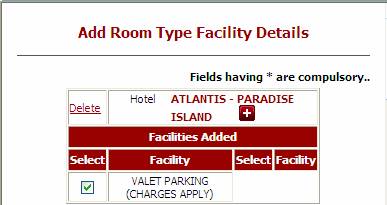
Specific facilities can be added to specific room types, for
example the Deluxe Suite may have a Jacuzzi. The facilities loaded here are in
addition to the General Room Facilities loaded. The
facilities defined against the Room Type Facility will appear for the specified
room type only. The room facilities will display to the user during the booking
process when the user clicks on the ‘View’ link on the Search Results screen.
Click on Room Type
Facility à Attach Room Type Facility
Tick the Required Facilities and Submit.
This is how it looks when a facility is added.
![]()
To delete a facility Click on Facility another window giving an
option to delete will be displayed. Select the facility and click on Delete.
This area of the system holds geographical location information
such as the distance from various landmarks, e.g. airport, tourist sights,
shopping areas etc. Distance can be provided in kilometers or miles. This
information is shown to users of the Back Office booking engine and the AWBE
sites via the Product Information ‘View’ link. This field is required as
needed.
Click on Hotel Distances à Add Hotel Distance.
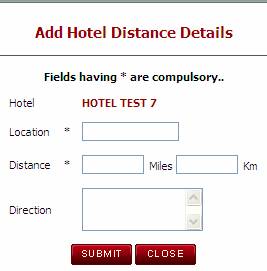
n
Hotel à The name of the Hotel
is displayed automatically.
n
Location à The closest landmark to the hotel that which will be the point of
interest to the Pax.
n
Distance à Distance between the closest landmark
that was given above and the hotel.
n
Miles à This is where you enter the Distance in Miles (numeric value). If
the distance is entered in miles, the system will automatically convert and
update the distances in Kilometers and vice versa
n
Km à This is where you enter the Distance in Kilometers (numeric value).
If the distance is entered in kilometers, the system will automatically convert
and update the distances in miles and vice versa
n
Direction àThe detail Direction to
that point of interest from the Hotel.
Note - In the search result when you click on
the ‘View’ link, the information entered here will come under the Point of
Interest section on the Fact Sheet
Once you fill in these details click on Submit.
The Hotel messages loaded in this area
are used for displaying important information to the user prior to booking. The
messages here can be defined to display based on travel dates or departure
dates. The messages are for information purposes and will not restrict a user
from making a quote or booking. It is
also possible to print these messages on certain client or supplier
documentation.
Click on Hotel Messages à Add
Message.
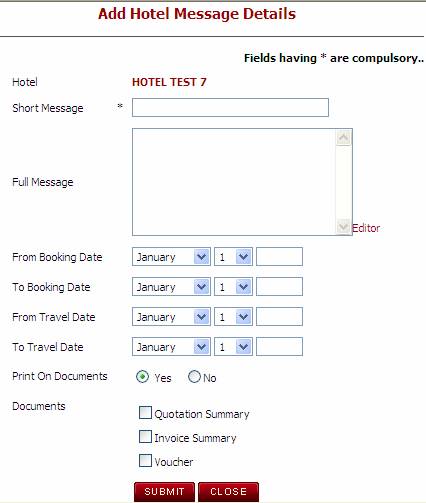
n
Short Message à This can be used to
define a short description of the message (or to give the message a header). (E.g.
renovation). This will be displayed to the user during the booking process.
n
Full Message à The full message that
you want to convey to the passenger e.g. Boutique closed for renovation.
n
From / To Booking Date à The date bands entered here will validate and display the message
if the service is booked within the dates specified.
n
From Travel Date à The ‘From / To’ date bands entered here will validate and display
the message if the service is booked for travel between the dates added
n
To Travel Date à The ‘From / To’ date
bands entered here will validate and display the message if the service is
booked for travel between the dates added
n
Print on Documents à If you want the message to appear on one or multiple documents then
select yes. If YES is selected, the following field for Documents Checkbox will
be activated. If the Print on Documents is set to No, the checkboxes in the
Documents field will be disabled.
n
Documents (Checkbox) à Tick the Document on which you want the message to be printed.
(These fields are only enabled if the Print on Documents Flag is set to Yes.
Note – The message that is
entered at this level will be displayed as Additional info in the
Documentation.
Any image that has been loaded into the image library can be
attached to the property. The image can
be selected to be used on the AWBE, or in the Back office booking engine or in
both places. It is not mandatory to load images against a hotel but it does
improve the usability and general look and feel of your website to have images
displayed to the users.
Click on Hotel Picture à Add Picture.
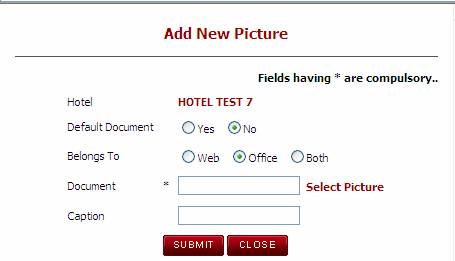
n Hotel à The name of the Hotel appears automatically.
n Default Document à This field determines what the default image is for this
hotel. You can upload any number of pictures and the picture that is defined
with the default of YES will be the first picture displayed for this hotel.
n Belongs To à This field defines whether
the picture is to be displayed for the AWBE / Back office or both.
n Document à Click on Select Picture. This will link to the Image
Library in the Back office Wizards where you can select the image/s to be
attached to the hotel.
n Caption à The image title that will be displayed when the user hovers
over the image (i.e. Hotel Lobby,
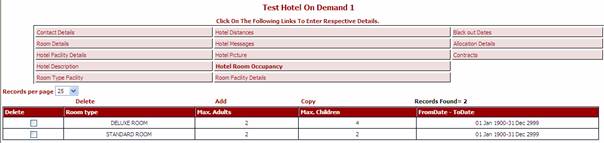
The Hotel Room Occupancy is where you specify the maximum number of
persons that are allowed per room type, along with the possible combinations of
adults and children and other rules. (Required)
Click on Hotel Room Occupancy à Add.
You can also Delete Room type with its combination or copy a whole
room type with its combination or Edit the Room Occupancy of each room by
clicking on the Room Occupancy Combination.

n Room Type à The room type that was entered at Room detail comes up
automatically.
n No Of Adults à The maximum number of Adults this contract allows.
n No Of Children àThe maximum number of Children
this contract allows.
n Max No Of Pax à The Total number of Pax including both Adult and Child.
Tip: In the Search Engine when you
look for more number of pax than the ones mentioned here, the system will not
display the room type, as it is defined here the maximum number of Adult and
Children permitted.
From / To Date à The date band that this
room type is valid for.
As mentioned earlier,
it is advised to create a date range for a period of 20 years or more so that
this area of the system does not need to be regularly maintained.
Note: Please ensure you tick the
box before submitting, if you do not tick the box the system will not update
the entry.
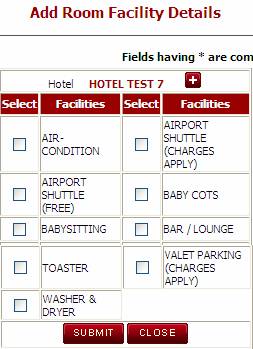
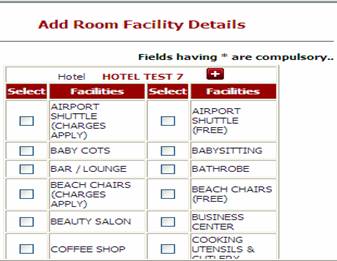
General Room Facilities can be attached
to the Rooms by selecting from the list of facilities that have been added via
the General Masters. The facilities added against this area will apply to all
room types defined at this hotel. The facilities defined against the Room Type
Facility will appear for the specified room type only. The room facilities will
display to the user during the booking process when the user clicks on the ‘View’
link on the Search Results screen.
Click on Room Facility Details à Attach
Facility.
Date bands can be added
to the Blackout Date area if the hotel is sold out or is closed over specific
dates. If a hotel has a blackout date added, the hotel will display to the user
during the booking process, but the user will not be able to book this property
/ room type. (Required as needed)
Please note: Any
blackout dates added here can be viewed via the blackout date report. See
Reports à Blackout Date Report
Click on Black out
dates à Add new black out dates
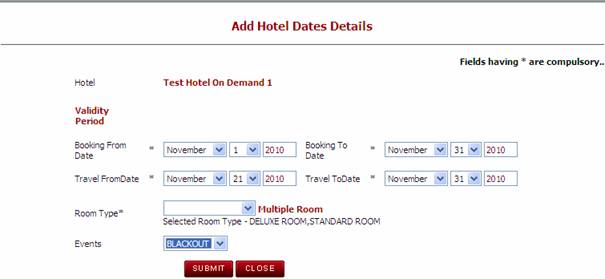
n Validity Period
Booking From / To dates à These dates will determine the blackout period based on the booking dates. You can
choose to enter the booking from / to dates or the travel from / to dates. This
entry will depend on the rule defined by the hotel.
n Travel From / To à These dates will determine the blackout rule based on the
travel dates of the booking. You can choose to enter the booking from / to
dates or the travel from / to dates depending on the rule from the hotel.
n Room type à This field allows you to select a room type where the
blackout date applies. If the blackout date applies to all room types then you
can leave this field blank and the system (by default) will apply the blackout
rule to all room types. If the blackout date only applies to a specific room
type, click on the drop down for room type and select the applicable room.
n Events à This field allows you to define a reason for the close out
date. The events shown in this drop down are sourced from the Events Parameter
in the General Masters. The event message is for informational purposes only.
It is displayed to the user during the booking process in the Back Office when
they click on the link for view blackout dates.
The Allocation Details area of the
system is where you define the allocation rules for the specified Hotel. This
area of the system allows you to perform the following functions
- Create
allocation record for a Hotel
- Create
release days for the Allocation
- Create
different allocation types (free sale, back2back, General)
1.1.12a Add
Allocation
To add new allocation or to modify
existing allocation, click on the link for Allocation Details. The following
screen will be displayed. The records that have already been added will display
in a summary page. To display an existing allocation record, click anywhere in
the row that you wish to view. To add a new allocation, click on ‘Add
Allocations’ and the below window will be displayed.
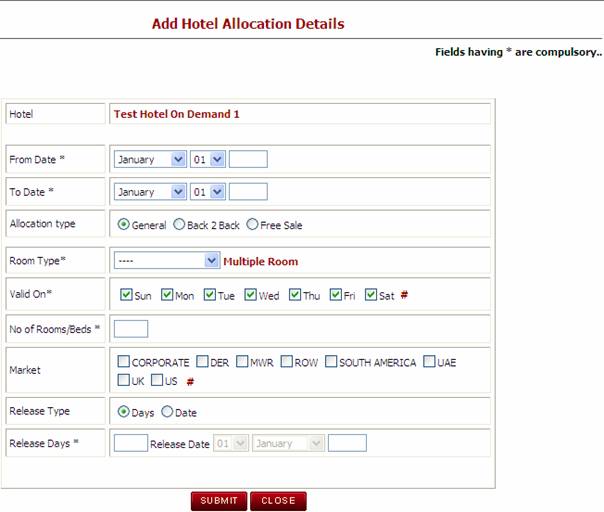
Each field denoted with * is mandatory
n
Hotel Name à This field is automatically populated from the previous screen
n
From Date / To Date à The dates that
the allocation will apply for, if not entered the multiple Dates application
above.
n
Allocation Type à There are 3 types of Allocation in the Illusions system. General, Back to Back or Free
o
General à Allocation available for the company
o
Back to Back à Committed
Rooms, the DMC owns it (or has pre-purchased)
o
Free sale à when the
hotel gives you rooms to sell without reporting.
n
Room Type à The Room type the allocation is to be created for. You can select
one room type, any room type or multiple room types. The drop down list for
Room Types will show you only the room types that have been loaded against the
hotel.
o
Any à If you select the room type of ‘any’, the system will allow you to
use the allocation against any of the room types loaded. For example, if you
have 2 room types (Standard Room & Deluxe Room) and the hotel gives you an
allocation of 5 rooms to use in either room category, you can select ‘any’. The
system will then use the same allocation pool regardless of whether the user
has booked a standard room or a deluxe room
o
Multiple Room Types à If you select the link for ‘multiple rooms’, a pop up box will
appear which will allow you to select a specific room type. In this scenario,
if you were adding an allocation of 5 rooms and you selected the checkbox for
the Standard Room and the Deluxe room, the system would create 5 rooms of
allocation against each specific room.
o
Single Room Type à If you select a single room type from the drop down list, then the
allocation will only be stored against the room type specified
n
Valid On à This field allows you to specify the days that the allocation is
applicable. If the allocation is only available for Friday and Saturday, then
you can select the check box against Friday & Saturday only. If all days
are required, you can click on the # key at the end of the row which will
select all days by default
n
No of Rooms/Beds à the number of rooms you wish to create for this allotment record
n
Market à The market that these rooms have to be sold in. For Example, if
the hotel has provided allocation but only for use for the
n
Release Type à This defines whether it will be released back by date or days. If
you select date, the date field in the release day’s field will be activated so
that you can enter the date that the allocation is to be released.
n
Release Days à The number of days of the release period, or alternatively a
specific date. This radio buttons will be enabled as per the Release type.
Below screen displays after the
Allocation is set for this room type.
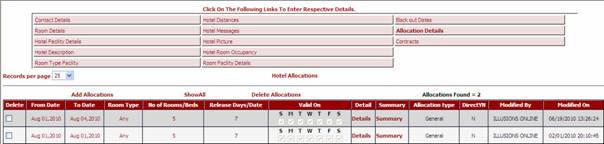
The Allocation Details link can be used
to look at specific allocation details for each day along with the bookings
being held against each allocation record.

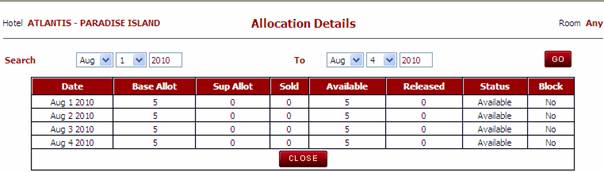
Click on Details of the specific date
band and you will be directed to the below window
Chose the date that you want to see and
Click on Go.
If any bookings are held against the
date range you have selected, the booking reference number will appear as a
hyperlink in the ‘Res No’ field. The user can click on the booking number
hyperlink and the system will take the user to the booking selected.
This link can be used to look at
specific allocation sales, whether it is released or available.
This is a link and takes the user directly to the contract wizard.
In order for a hotel to be booked in the Back Office or AWBE, the hotel must
have a valid contract assigned.
When the user clicks on Contract the system displays “Find
Contract. Click on Add New Contract to add contract to the Hotel.

When the user clicks on Add New Contract the below page is
displayed.

With à The Contract engine is
the same for Hotel and Service. Select on the radio button of the Hotel and
click NEXT. If the name of the hotel is not displayed then click on Select and
choose the hotel for which you are building the Contract.
The Add Contract screen as below will be displayed to load the
Contract details.
This is a link and takes the user directly to the contract wizard.
In order for a hotel to be booked in the Back Office or AWBE, the hotel must
have a valid contract assigned. See separate manual for contract details.
Wizard → Hotel Wizard
Once a Hotel is created the user can
search a Hotel using the Filter By option. Click on the radio button Begins
with or Contains. By default radio button of Contains will be active.

After clicking on GO, the
list of the hotels matching the parameters will be displayed.
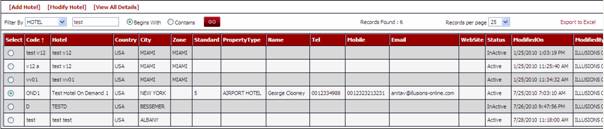
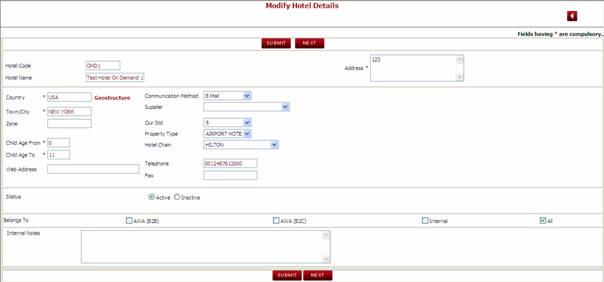
To modify the information of the hotel click on Modify hotel; the
system will then display the Modify Hotel details where the user can edit and
click on Submit to save the changes.
Various other parameters can be used to search for a hotel such as
Hotel Code, Hotel Chain, Standard, Country, Town/City or even a blank
search. Click on ![]() ,
system will display the screen below
,
system will display the screen below

Fill in the search criteria and click on search. System will
display all the hotels as per the search.
3. Deleting a
Hotel
Once a hotel has been created, the system will not allow you to
delete the hotel given it may be attached to other records such as new bookings
or supplier payments. If you wish to remove a hotel from sale, you can do this
by making the Hotel or contracts inactive or applying a blackout date for the
entire year. To inactivate a hotel get into the Modify mode and select
Inactive.