Accounts User Manual
Table of Content
1. Accessing the Accounts Module
The Accounts module in the Illusions system
provides you with the facility for maintaining basic level financial accounting
functionalities. The module primarily deals with invoice generation, payment
history, accounts receivable, accounts payable and basic reconciliation
processes.
Please note that we do not consider the
Illusions system as a full financial accounting system. We perform the tasks
required in order to complete a booking lifecycle but recommend your financial
control, reconciliation and reporting be managed through an external finance
system
We recommend the use of our Finance
XML’s for the purpose of exporting finance data to your third party financial
accounting system.
1. Accessing the Accounts Module
The main Accounts module can be accessed
using the Accounts at the home page as shown in the figure below.

On the Account Module drop down, the
options for managing accounts are listed. Each of these options will be
described in detail in this document.
- Raise Invoice
- View Invoice
- Receive Payments
- View Payments
- Raise Credit Note
- Reconcile Invoices
– Purchase Invoice
- View Reconciled
Invoices – View Purchase Invoice
- Post Payments –
Clear Batch
- View Payments –
View Batch
2. Raise Invoice
The Raise
Invoice function in Illusions is the trigger which informs the system that the
booking is now a recognized sale. Once an invoice has been raised, the system
will post the sales figures to the profit report, and post the purchase amounts
to the creditors report. Once an invoice has been raised, the booking will
appear in the Purchase Invoice which means a supplier payment can now be made
against the booking.

An invoice can be
raised for all the bookings for which full payment is received.
n
Our
Reference No à The Booking number (mandatory
field) that you wish to raise the invoice for
Click on
“Raise” button to generate an invoice for the specific booking.
Note: Depending on your
company setup, there are 2 ways the Illusions system can be configured for
managing the Raise Invoice process.
1.
For
Tour Operators, the system can be set to validate that no invoice can be raised
without the full payment being receipted.
2.
Alternatively
some companies that have mainly credit clients, can have their system
configured to raise the invoice prior to the client payment being made.
Please discuss these options
with the Illusions help desk team during the implementation phase so the
correct settings can be applied to your environment.
If
Option One is configured, then the system will expect full payment to be made
before the user can raise an invoice.
If
this configuration is used, and the user tries to raise an invoice without full
payment being made, then the following message will appear. “Invoice cannot be raised unless the
booking balance equals zero.”
In this scenario it is
important to note that an invoice cannot be raised unless the booking balance
equals zero or if the booking due amount is greater than zero.
If Option Two is configured,
the user can raise an invoice at any stage, as long as there is a live element
(or an element that has a price in the sell charges)
In both cases after the
Raise Invoice function has been done, the following rules will apply.
n
Once
the invoice is raised, the booking can no longer be modified.
n
Once
the invoice is raised, refund is not allowed. A credit note must be raised
against the booking before a refund can be applied.
n
If
a booking needs to be modified after the invoice has been raised, the user must
raise a credit note in order to ‘unlock’ the booking. The ‘Credit Note’
re-opens the booking and allows the user to modify the booking. Users must
remember to raise the invoice again once the changes are complete so that the
correct postings are sent to the external finance system.
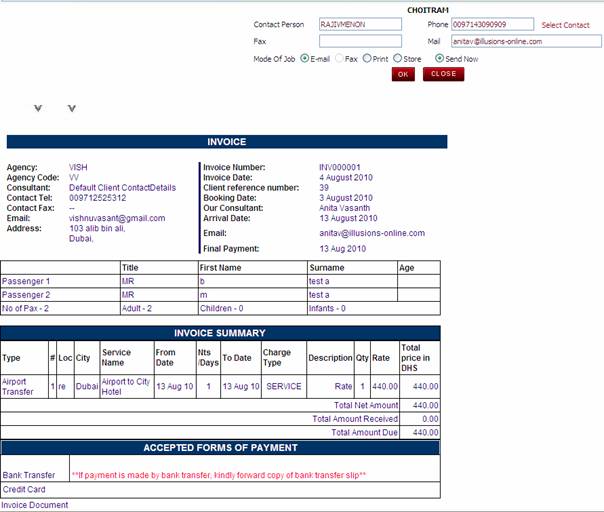
Upon raising
the invoice, the invoice document will appear, and the invoice number will be
saved in the Invoice History at booking header level.

A screen as shown above will
appear which displays all the invoice details of that particular booking.
3. View Invoice
This feature is used to view
all the invoices generated for the bookings present in the system. There are
various options available to search a particular invoice. You have to input the
booking reservation number to find a particular invoice. All the other fields
are used as supplementary information to enhance and refine the search.

n
Our Ref à This is the
same as the Our Reference No. field
n
Invoice Number
à This is the
number of the invoice. A number is defined against each invoice every time it
is raised. The Invoice Number history can be viewed from within a booking by
clicking on the ‘Invoice History’ link.
n
Invoice Date
à This is the
date the invoice was raised

A screen as seen in the snapshot above
will be displayed when a booking reference number is searched. All the details
of invoice are displayed. You can click on the Invoice No. or the Show Invoice
button to view the complete invoice. Below is the screen that will appear when
this option is clicked.
The invoice displayed can be printed or
emailed as per the standard documentation features in Illusions.
4.
Receive Payments
When a payment is received
from a client, you use this option to input the received payments. Any amounts
receipted in this screen will be updated against the reference number the
payment is receipted against.
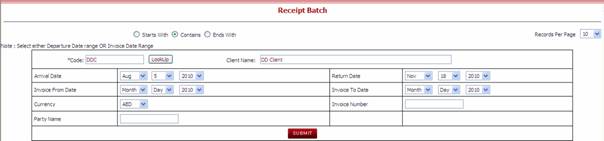
The Receipt Batch will allow
the user to receive payment
n
Code à Use the
Lookup to select the Client for whom you are receiving the payment.
n
Arrival / Return Date à The
Arrival and Return date. This can be a Date range and not necessarily the exact
date.
n
Invoice From / To Date à The Date
when the invoice was raised for the booking. Need not be an exact date, even a
date range will give the result.
Note: Either
the Arrival or Invoice Date is mandatory.
n
Currency à The
currency that you are receipting the payment against. The currency selected
here must match the sell currency of the booking you are receipting payment
against. If the currency selected does not match the currency in the booking
then you will be unable to receipt payment
n
Invoice Number à This is
the invoice number of the booking you wish to receipt payment against
n
Party Name à This is
the party name of the booking you wish to receipt payment against. The name of the person which is not mandatory
if the above options are selected.
Note: A message
“No Records Found” will appear if the sell currency in the booking and the
currency in this screen do not match.
A new pane will be opened in the same
window just below the search Reference No. search window. You will see a screen
like the one shown in the figure below. The system will automatically show the
‘Amount Due’ for the booking in the ‘Amt Due’ Column. When you Tick the box
adjacent to the Amount Due, it will update the Invoice Amount Received Box to
show the entire amount to be paid. If you only wish to receipt a part payment,
then you can manually type the amount to be paid directly into the Invoice
Amount Received Box. (i.e The field on the Left corner of the page).
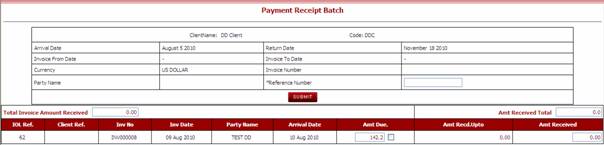
The above page will be displayed showing
the amount due. The Client can either make full payment or part payment. If the
client is making full payment tick box at the Amount Due and the amount will be
reflecting in the Amt Received Total. If the Client is making part payment,
enter the amount in the box Amt Received and the Amt Received Total will be
updated.
Reference No à A reference number is
mandatory. This is for accounting purpose. The User can have number in
sequence.
On the Receive Payments
screen (figure above) click on “Submit” button after you have finished
inputting the details. The following screen will be displayed.
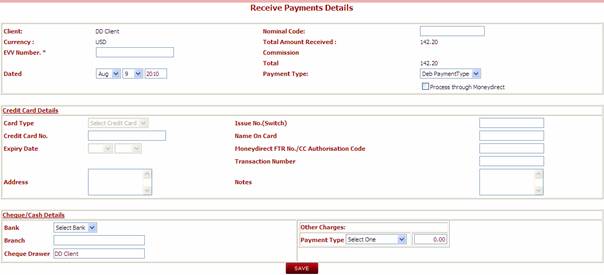
The Receive Payment Details screen is
where you can enter details regarding the type of payment you are receipting.
You can receipt payment against many different payment types such as cash,
credit card, cheque etc. The Payment Types used to capture the type of payment
are created in the General Masters called “Payment Type”
n
Nominal Code
à Accounting Code where this
receipt should be posted (If the accounts integration in configured in that
way)
n
EVV number à Electronic Voucher number for the
purpose of reconciling against the manual receipt.
n
Dated à Date of the
payment Receipt
n
Payment Type
à the payment has bee received
though Cheque, cash or bank transfer. The Payment Types shown in this drop-down
are sourced from the Payment Type field in the General Masters.
Following fields will be enabled only
if payment type selected in “Credit Card”
n
Card Type à Card Type
like MasterCard or Visa (as per the Card type master in General Masters)
n
Credit Card
No à Credit Card Number
n
Expiry Date à Expiry date
on the card
n
Address à Address of
the credit card holder
n
Issue No (Switch)
à Used for informational
purposes only
n
Name on Card
à Name on the card
n
Money Direct
FTR No à Transaction number of
MoneyDirect if the receipt has been processed through MoneyDirect. (MoneyDirect
is an online payment gateway used in
n
Transaction
Number à Transaction number from the
credit card gateway
n
Notes à Remarks
Following fields will are used for all
other payment types except “Credit Card”
n
Bank à list of
banks (comes from General Masters > Bank info)
n
Branch à Branch name
of the bank
n
Cheque
Drawer à Cheque drawers name
Once you click on “Save” the receipt
details are saved.
Note: Once
the Receive payment is done, the booking goes to the Batch. That is the payment
is the queue to be made to the suppliers.
5.
Raise Credit Notes
The Credit Note
facility is used to reverse the Raise Invoice function. A Credit Note can only
be raised if the Raise Invoice function has been performed. The Credit Note
function unlocks the booking so it can be modified.

Enter the booking reference no for which
the credit note has to be raised.
Once you click on submit,
the credit Note is raised for this booking.
Note: Once the Credit note is raised for
a booking, the booking is again available for amendment. Once you raise a credit note, it is not
possible to view the invoice through the “view invoice” link until the Raise
Invoice function has been performed again. (You can view the invoice through
the Invoice History link in the booking header)
You need to “Raise invoice” again for
this booking once you have completed the modifications.
6.
Reconcile Invoice
The Reconcile invoice otherwise
called as Purchase invoice can be generated using one of three search
categories. Click on the relevant category to generate purchase invoice based
on:
n
Hotel
n
Supplier
n
Booking Ref
The Purchase Invoice
function within Illusions is where you will see one or more bookings which are
due for payment to a Hotel, Supplier or Ground Handler. All amounts shown in
the purchase invoice are based on the Payable rate or Buy rate which is defined
against the contract / booking.
![]()
6.1 Hotel
Click on the hyperlink for ‘Hotel’
to display the Purchase invoice for hotel supplier. You will see a search screen
which provides you with detailed search criteria to allow you to find a
specific hotel or purchase invoice. If you do not wish to select a specific
hotel, you can directly click on the ‘Search’ button to list all the hotels
available in the system database.

Note: you can
select only one of the dates: Arrival From / To Dates or Invoice From / To Dates.
Hotel Search results will be displayed
as shown in the screen below based on the search criteria entered.

A list of hotels which have bookings
awaiting payment will be shown in the reconcile invoice list. To process the invoice
click on the Hotel you wish to pay.
The Purchase Invoice screen will be
displayed (as per below). The purchase Invoice screen will list the bookings
that are due for payment for the selected Hotel.
To process the Purchase Invoice, you can
enter the Nominal Code (which is the reference number you wish to give this
purchase invoice batch); and select the bookings that you wish to include in
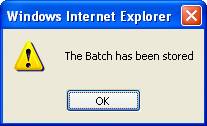
this payment to the hotel. When you are finished, click on the ‘save’ button;
you will get a prompt alerting that the batch has been stored.
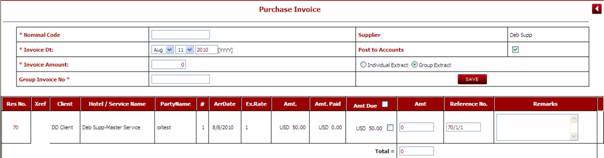
- Ref No à The user can click
on the booking reference number hyperlink from within the purchase invoice
and view the booking details. When the user has finished working in
the booking, they should use the <backspace> key on their keyboard
to return to the Purchase Invoice.
- XRef
à This field will display the Client Reference
Number (if applicable)
- Hotel / Service Name à (For Hotel Suppliers only) à The user can click
on the hyperlink for the Hotel Name from within the Purchase Invoice and
view the Hotel Tariff. This feature is only available for Hotels and not
Services
- Party Name à The party name of
the booking
- # à The element number
of the booking element. This is helpful if you have multiple elements
within one booking for the same Hotel as it helps to differentiate the
payment per element
- ArrDate à The arrival date of
the element to be paid
- Ex. Date à The departure date
of the element to be paid
- Amt à The total amount
due for payment (as per the booking cost)
- Amt Paid à The total amount
previously paid for this booking element (for this supplier).
- Amt Due à The total amount
due (Amount minus Amt Paid = Amt Due). If you select the checkbox in this
field, it will automatically update the Amount field.
- Amount
à The total amount that the user wishes to pay
in this transaction. If you
select the checkbox in the Amt Due field, this will update the Amount
field automatically. You can modify the amount field to pay less or more
(depending on the supplier invoice to be paid)
- Reference
Number à This shows the Illusions reference number plus
element id
- Remarks à The A/P user can add remarks into the text box
provided (up to 100 characters). Any remarks added to this field can be
included in the Purchase Invoice XML that is generated to a third party
finance system
Upon submitting the data for the
purchase invoice, a batch job is created for the selected hotel and the
relevant selected bookings.
Note: The Purchase Invoice will not show
as being ‘paid’ against the booking until the Batch has been Cleared. See
section for ‘Clear Batch’
Once you have saved the Purchase
Invoice, the following window will appear to indicate the batch has been saved
The next screen that appears will allow
you to enter purchase invoice details for a new hotel or will allow you to
continue to process another purchase invoice for the same hotel.
![]()
6.2 Supplier
The procedure here is similar to the one
described in generating purchase invoice for Hotels but the search is for a
specific Supplier / Ground Handler.

The process for saving a purchase
invoice for a supplier is the same as per Hotel
6.3 Booking Reference
You can also generate a purchase invoice
for a suppler using the booking reference number. Search the booking number to
locate the supplier details.

All the Hotels and Suppliers associated
to the booking number will be displayed in the search results screen. One or
multiple hotels / suppliers can be shown in this list depending on the number
of elements in your booking.
You can proceed in the similar way as it
was done for generating purchase invoice for hotel/supplier.
7.
View Reconciled Invoice

Enter the Reference No. or
the Purchase Invoice No and click on Go button to view all the purchase
invoices generated. You can also specify a date to refine your search. A screen
as shown below will be displayed with the invoices satisfying the search
criteria.
8.
Post Payments
Once you have
completed the reconcile invoice process, you must clear the batch which will
then post the payment for the payment against each individual booking.
Here you have to select the department
as it is a mandatory requirement. You also have to select the currency. Specify
if the batches are for the Hotels or the suppliers, select a proper date and
input the invoice number if desired.

Once you have the relevant batch job
displayed, you can ‘clear’ the batch which will then post the relevant amounts
against the booking. Please note that the booking will not show any hotel /
supplier payment until the batch has been cleared.

On the screen above you can
enter the payment information that will be used for payment to the supplier. At
the point you save this information, the payment details will be updated
against each individual booking that has been saved in the batch.
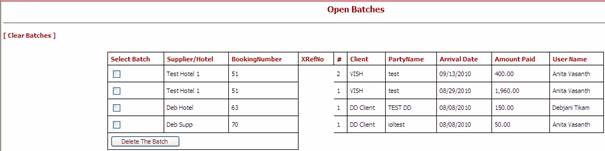
You can also view the open
batches that are ready for payment, by clicking on ‘View Open Batches’.
A list of all open batches will be
displayed; this is shown in the figure below.
9.
View Payment
View Payment is used to view the payment
that is made already. Select the desired search criteria and click Submit to
view the output.

You will see on the View Cleared Batches
screen that you could have one or multiple batches that have been cleared.
